Standing Desk Cable Management: How to Add Slack That Won't Snag When You Raise and Lower
Quick Answer: For a standing desk, secure power and excess cable under the desktop, then create one flexible "service loop" that moves with the desk. Bundle only the moving cables (monitor, keyboard, USB hub) into a sleeve, anchor the sleeve at the desk, and leave slack near the lowest position so nothing tugs. Keep one clean drop to the wall outlet using Velcro and a cable spine or raceway.
TL;DR — What You Need
- Put the power strip under the desk, not on the floor
- Separate fixed cables (wall power) from moving cables (desktop gear)
- Add a service loop with slack at the lowest desk height
- Use a cable tray + Velcro ties (easier than zip ties to adjust)
- Route one "main drop" to the outlet — ideally through a cable spine
- Use adhesive options if you can't drill (renter-friendly)
Quick Picks:
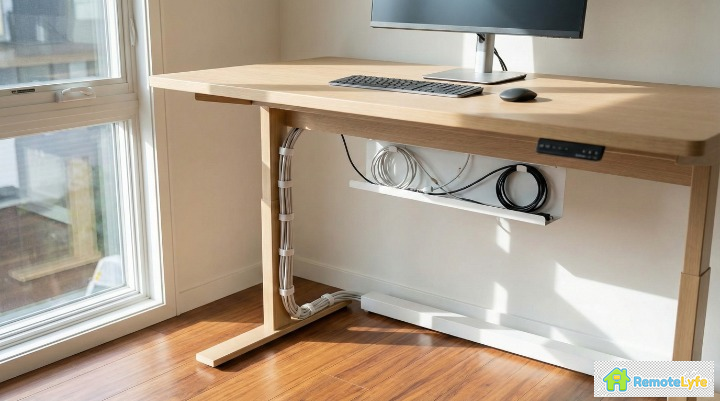
- Under-Desk Cable Tray — holds power bricks and excess cable
- Cable Management Spine — guides cables during movement
- Velcro Cable Ties — reusable, adjustable, no cutting
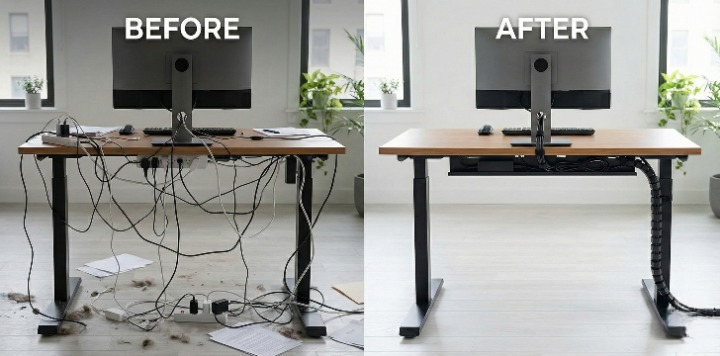
Why Standing Desks Break "Normal" Cable Management
Traditional cable management assumes your desk stays in one place. Standing desks change height by 12-20+ inches, which means:
- Cables get pulled when the desk rises (damaging connectors over time)
- Cables drag on the floor when the desk lowers (collecting dust, getting caught in chair wheels)
- Cable tension increases with every height change (especially hard on USB-C and HDMI connections)
The solution isn't more clips or ties — it's rethinking which cables move and which stay fixed.
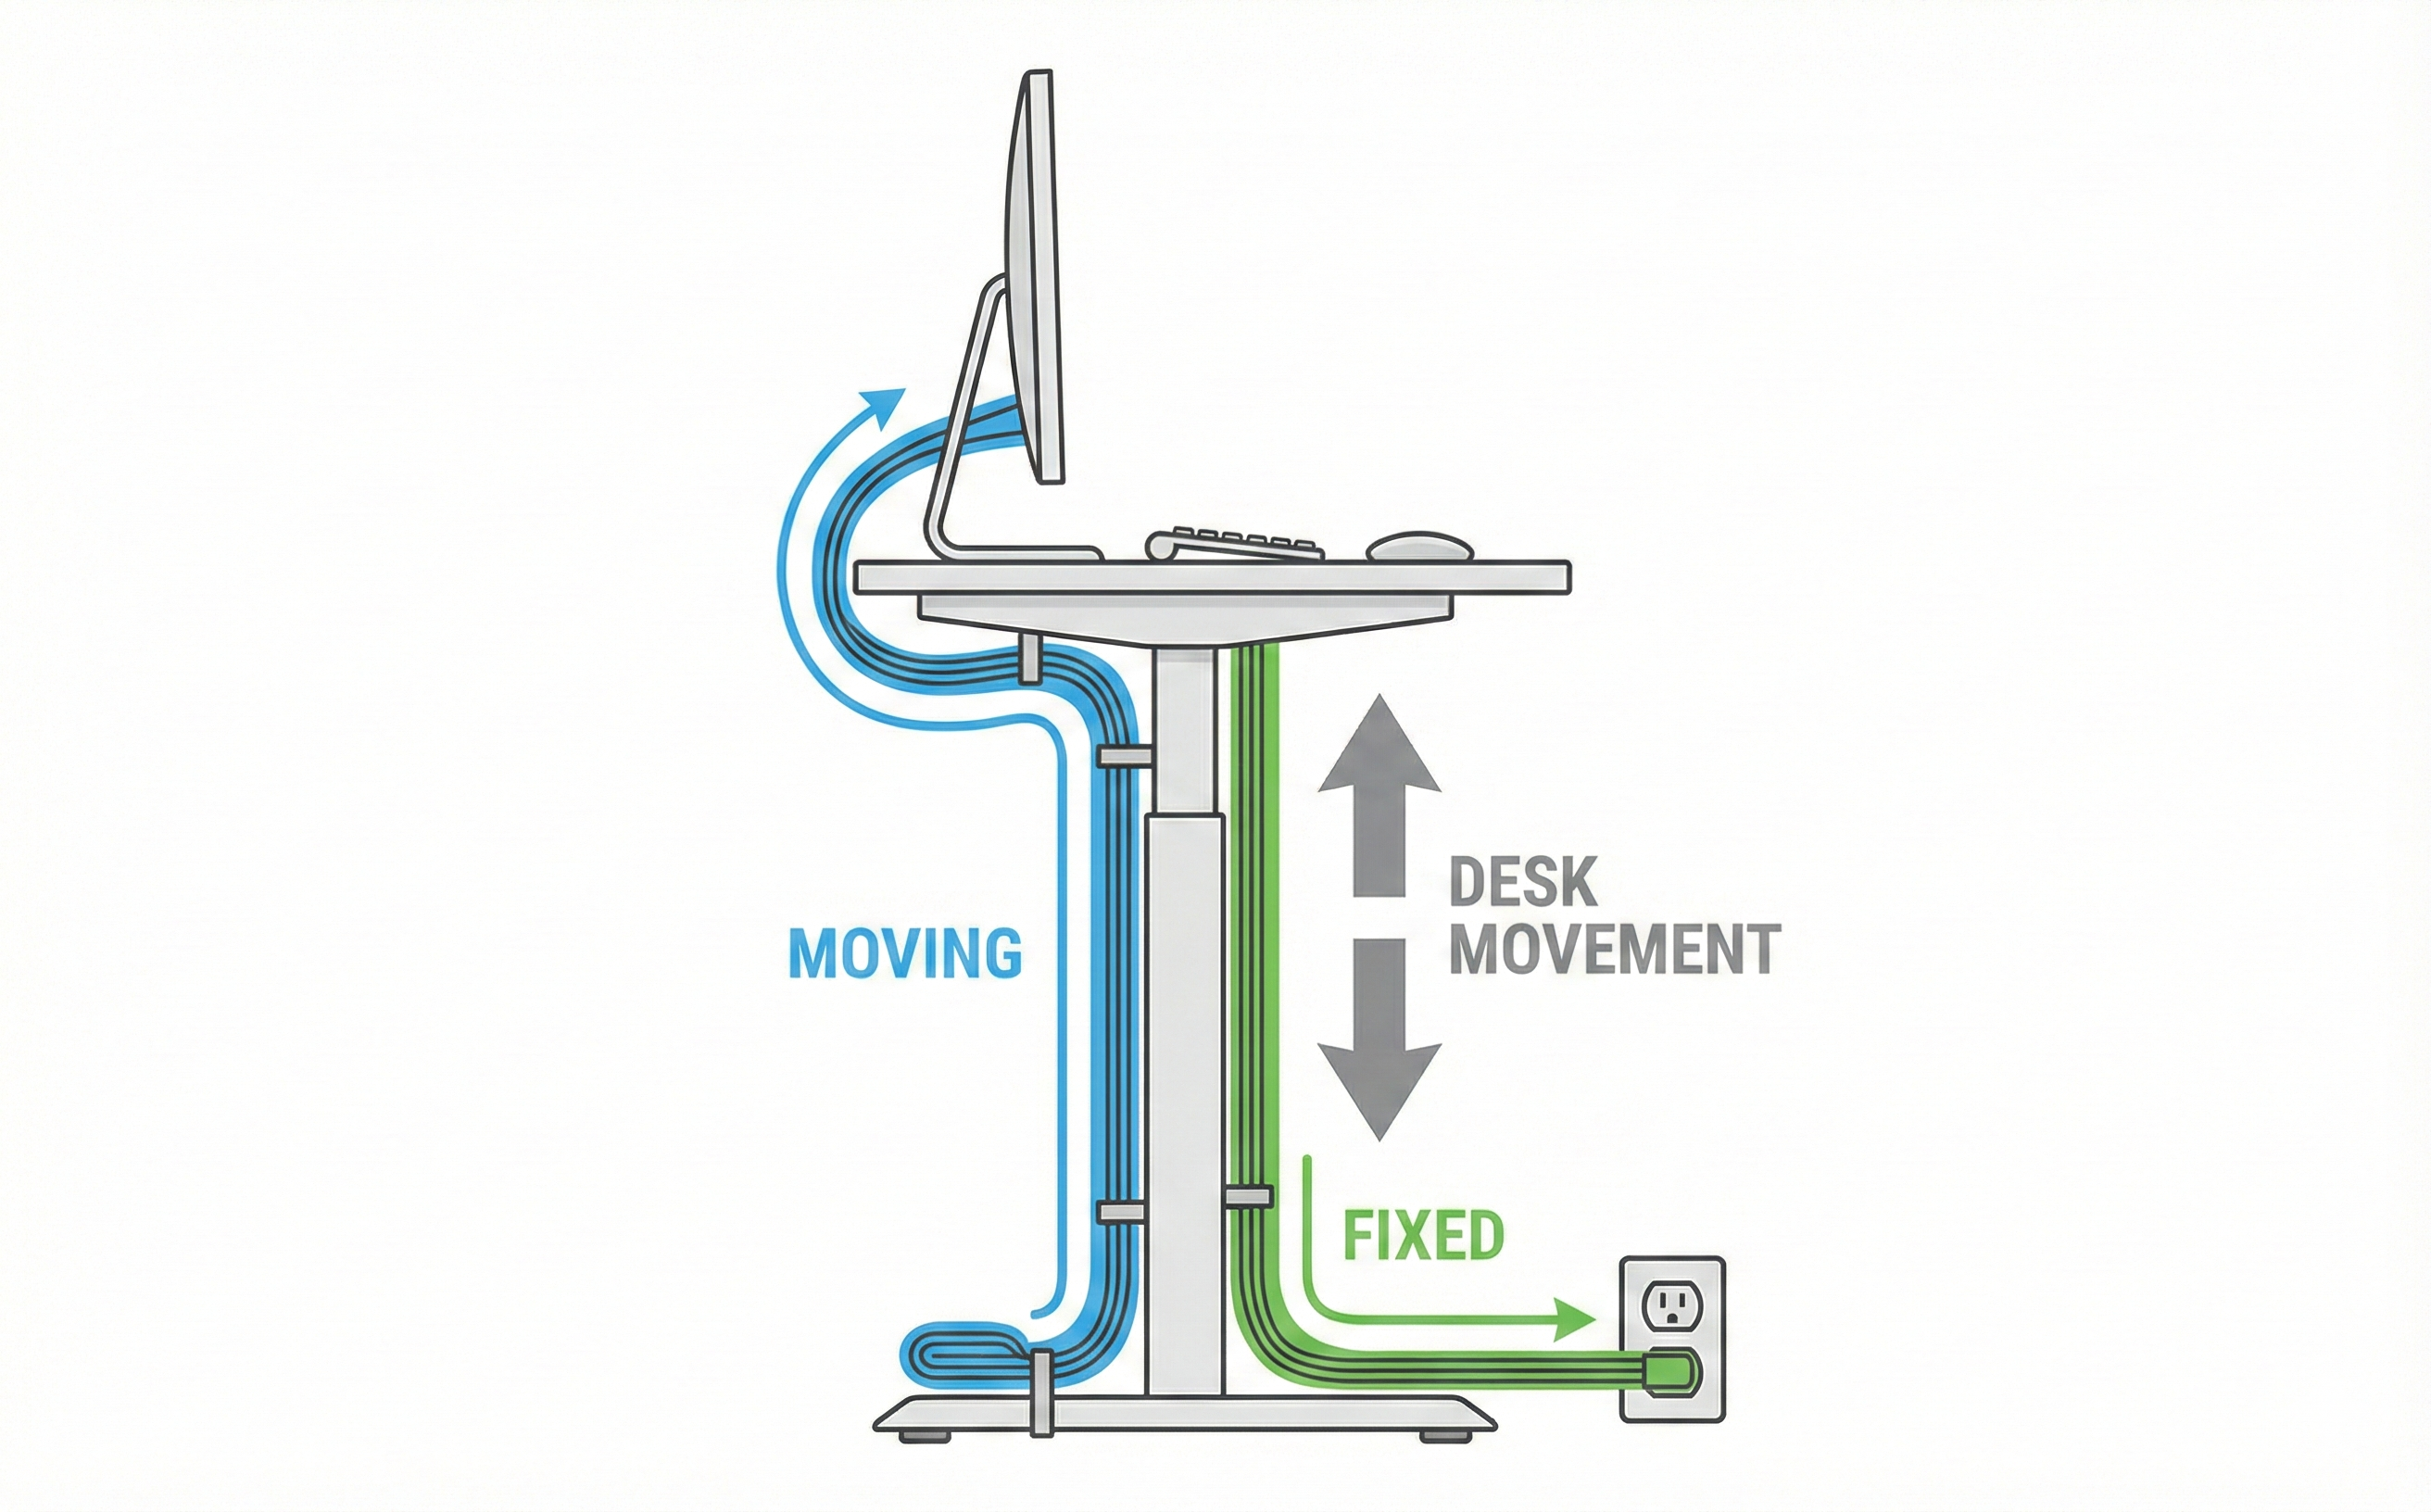
The 2-Cable-System Method (Fixed vs Moving)
The key insight: only ONE cable should travel between your desk and the wall — the main power cord. Everything else stays attached to the desk.
What Belongs in the Moving Bundle (Attached to Desk)
- Monitor power cable(s)
- Monitor video cable (HDMI, DisplayPort, USB-C)
- USB hub or docking station
- Keyboard and mouse cables (if wired)
- Webcam
- Microphone / audio interface
- Desk lamp
What Should Stay Fixed (Wall to Service Loop)
- Main power cord (from under-desk power strip to wall outlet)
- Ethernet cable (if hardwired — consider switching to WiFi)
| Cable Type | Where It Goes | Why |
|---|---|---|
| Monitor power | Under-desk tray → power strip | Moves with desk, no strain |
| USB hub | Mounted under desk | Short runs to all peripherals |
| Main power cord | Service loop to wall | Only cable handling movement |
| Ethernet | Service loop (or switch to WiFi) | Heavy cables drag and snag |
The "Service Loop" — How to Size Your Slack
A service loop is simply extra cable length that allows movement without pulling. Here's how to set it up:
Quick Test: The Lowest Height Pull-Check
- Lower your desk to the lowest sitting position
- Route your main power cord from the under-desk power strip, down one desk leg, to the wall
- Add a loop of slack near the floor (6-8 inches of extra cable coiled or bundled)
- Raise the desk to maximum standing height
- Check tension — the cable should never pull tight
Pro tip: If your cable barely reaches at full height, you need a longer power cord or extension. Don't stretch cables tight — repeated tension damages internal wires.
No-Drill Setup Options (Renter-Friendly)
Can't drill into your desk or walls? These solutions work without permanent modifications. The key is choosing the right mounting method for each component's weight and position.
Adhesive Cable Trays ↗
Modern adhesive technology has come a long way — 3M VHB (Very High Bond) tape can hold 10+ lbs per square inch when applied correctly. Look for trays specifically rated for 5+ lbs of holding capacity, which is plenty for most cable bundles and small power bricks.
The secret to adhesive success is surface preparation. Clean the mounting area with isopropyl alcohol (90% or higher) to remove oils and dust. Apply the tray, then wait a full 24 hours before loading it with cables. This curing time makes a huge difference in long-term holding power. Avoid mounting on textured surfaces — adhesive needs smooth contact to grip properly.
Clamp-On Cable Management ↗
Clamp-style mounts grip the desk edge without any adhesive or drilling, making them ideal for heavier items like power strips and USB hubs. They work by sandwiching the desktop between padded jaws, distributing weight across a larger area than adhesive alone.
Before buying, measure your desktop thickness — most clamps accommodate 0.5" to 2" thick surfaces, but some standing desks have thicker edges or beveled profiles that won't fit standard clamps. Also check the clamp's weight rating; a good power strip clamp should handle at least 5 lbs. The main downside is that clamps are visible from certain angles, so they work better toward the back of the desk where they're less noticeable.
Velcro + Adhesive Clips ↗
Velcro-based systems offer the most flexibility for cable management that evolves over time. You can reposition cables without buying new mounts, add or remove devices without starting over, and adjust tension as needed. This makes Velcro ideal for setups that change frequently.
The system works in two parts: adhesive-backed anchor points stick to your desk (legs, underside, frame), and reusable Velcro ties wrap around cable bundles and attach to the anchors. Unlike zip ties that must be cut and replaced, Velcro ties open and close hundreds of times. Use them along desk legs to guide your service loop, and under the desktop to keep peripheral cables organized. A pack of 50-100 ties costs under $15 and will last years.
Cable Spines (Vertebrae) ↗
A cable spine (also called cable vertebrae or cable chain) is a flexible plastic channel that guides cables from your desk down to the floor. The interlocking segments expand and contract as your desk moves, keeping cables neatly contained without tangling or dragging.
Cable spines shine in setups with many cables or desks with a wide height range (18+ inches of travel). They're overkill for simple setups with just 2-3 cables, where a basic service loop works fine. Most spines attach via clamp or screws, though some newer models offer adhesive mounting plates. When installing, position the spine near the back corner of your desk where it won't interfere with your legs or chair.
Shop No-Drill Cable Management
- Adhesive cable trays — best for lightweight cable bundles
- Clamp-on mounts — best for power strips and heavier items
- Velcro ties with adhesive anchors — most flexible/adjustable option
- Cable spines — best for complex setups with many cables
Standing Desk Layouts: Single Monitor vs Dual Monitor vs Laptop-Only
Your cable management approach depends heavily on how many devices you're connecting. Here's how to think about each common setup:
Single Monitor Setup
This is the simplest scenario to cable-manage. Your typical cable count: 1 monitor power cable, 1 video cable (HDMI, DisplayPort, or USB-C), and 2-3 peripheral cables (keyboard, mouse, webcam). Total: 4-6 cables running through your under-desk tray.
With a single monitor, you can often get away with basic cable management — a simple tray and a few Velcro ties. If your monitor supports USB-C with power delivery, you can reduce this even further by running a single USB-C cable that carries video, data, and power to your laptop.
Dual Monitor Setup
Two monitors double your video and power cable count, which is where cable management gets more challenging. You're looking at: 2 monitor power cables, 2 video cables, plus all your peripherals. Without a strategy, this becomes a tangled mess quickly.
The best solution for dual monitors is a USB-C docking station. A good dock reduces the cable situation dramatically — one USB-C cable from your laptop to the dock handles power delivery, video output to both monitors, and all USB peripherals. The dock itself mounts under your desk (many have VESA mounting holes), keeping the desktop clean. This transforms 8-10 cables into 3-4: one to your laptop, one power cord for the dock, and video cables from dock to monitors.
Laptop-Only (No External Monitor)
The minimalist approach — use your laptop screen as your only display. This creates the cleanest cable management scenario, with typically just 2-3 cables total: laptop charger, and perhaps an external keyboard/mouse if you prefer them over the built-in options.
To make this ergonomically sound, use a laptop stand to raise the screen to eye level and pair it with an external keyboard and mouse. This prevents neck strain from looking down at a low screen. The trade-off is screen size, but for focused work or limited desk space, laptop-only setups can be perfectly productive.
Simplify Multi-Monitor Setups
A USB-C dock is the single best investment for reducing cable clutter with dual monitors:
Common Cable Management Failure Points
Watch out for these issues that cause cable management to fail over time:
- Connector stress — Cables pulled at an angle damage ports. Use strain relief clips near connectors.
- Floor drag — Cables touching the floor collect dust and get caught in chair wheels. Keep all cables above floor level.
- Zip tie over-tightening — Zip ties cut into cables over time. Use Velcro ties instead — they're adjustable and reusable.
- Power brick heat — Power adapters in enclosed trays can overheat. Leave ventilation gaps or mount bricks separately.
- Too many cables in one sleeve — Overstuffed sleeves don't flex well. Use multiple smaller bundles if needed.
Shopping Checklist: What to Buy First
Start with these essentials (you don't need everything at once):
Must-Have (Start Here)
- ☐ Under-desk cable tray — $15-30
- ☐ Velcro cable ties (pack of 50+) — $8-12
- ☐ Surge protector with 6-10 ft cord — $20-35
Nice-to-Have (Add Later)
- ☐ Cable spine/vertebrae — $15-25
- ☐ Split cable sleeve — $10-15
- ☐ USB hub/dock with mounting bracket — $40-80
- ☐ Adhesive cable clips — $8-12
Frequently Asked Questions
How much cable slack do I need for a standing desk?
You need enough slack to cover the full range of motion from lowest to highest position, plus 6-8 inches extra. Lower your desk to sitting height, then measure the cable path to the floor outlet. Add slack so cables don't pull tight at the highest setting.
Where should I mount a power strip on a standing desk?
Mount your power strip under the desk, attached to the frame or desktop underside. This keeps the power strip moving with the desk, so only one cable (the main power cord) needs to handle the height change. Use a surge protector with a 6-10 foot cord for flexibility.
How do I cable-manage without drilling into my desk?
Use adhesive cable trays, clamp-on cable management spines, or Velcro tie wraps with adhesive mounts. 3M Command strips work well for lightweight cable routing. For heavier power strips, use clamp-style mounts that grip the desk edge without drilling.
Do I need a cable chain/spine for a standing desk?
A cable chain (also called cable spine or vertebrae) helps if you have many cables or a very tall desk range. It guides cables smoothly during movement and prevents tangling. For simpler setups (under 5 cables), a service loop with Velcro ties works fine.
Are adhesive cable mounts strong enough for sit-stand use?
Yes, if you use quality adhesive mounts rated for the weight. 3M VHB tape holds up to 10 lbs per square inch. Clean the surface with isopropyl alcohol before applying, let cure for 24 hours, and don't overload individual clips.
What's the quickest way to cable-manage without buying anything?
Bundle your cables with twist ties or rubber bands you already have. Route everything along one desk leg, leaving slack at the bottom. Use binder clips attached to the desk edge as temporary cable guides. This 10-minute fix works while you plan a permanent solution.
How often should I re-check my cable management?
Check monthly, or whenever you add new devices. Look for cables that have shifted, connectors under tension, or dust buildup in trays. A quick 5-minute inspection prevents problems before they damage your equipment.